


In this series of articles/tutorials, we are going to be making a small 2D Space Shooter using Unity3D and, later on, using the New Input System.
The Player Script
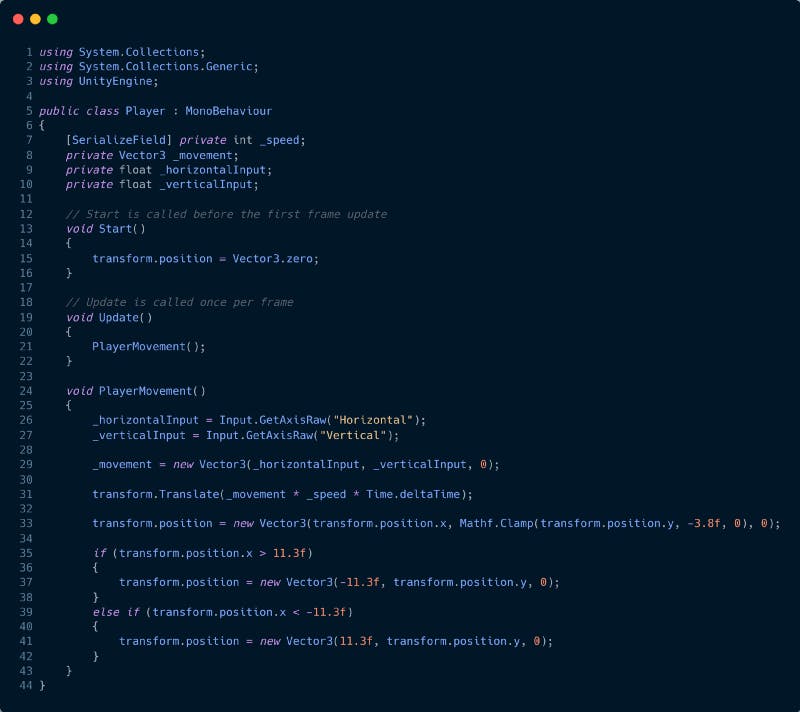
The Player script is a series of instructions that allows us to move the Player (Cube) using the WASD keys from the keyboard.
From line 7 to 10 we have some Variables that stores values. A Variables needs to have 3 requirement, a reference type(Private or Public), a data type (int, Vector3, float, bool, string, etc) and a name (_speed, _movement, _horizontalInput, etc).

private variables cannot be accessed by other scripts nor can be seen on the inspector; public variables are the opposite; they can be accessed by other scripts and been seen on the Inspector. If you want to see a private variable on the inspector, you need to use the attribute [SerealizeField] like on line 7

On the Update() method, we are calling the PlayerMovement() method, which is doing the calculation to move the player in the game. In lines 26 and 27, we are storing inside the Variables the value that is created when we press the WASD keys; Input.GetAxisRaw() is using the Input method from Unity; when adding “Horizontal” we are accessing the 0 and 1 when we press the A and D key Up and Down, “Vertical” is using W and S, Left and Right

Lines 30 to 42 were moving the Player using the transform.Translate() on line 31 and line 33, we use Mathf.Clamp() to not allow our player to go beyond the -3.8f y-axis. Line 35 to 42, we are using a IF statement to change the player position if it goes out of the bound of the screen.
Let's Do Some Shooting
Creating The Laser
Let's create a new 3D Object of type Capsule, name it Laser, and adjust Transform how it looks on the image. It will look like a little Tic-tac 😅


Please create a new Material inside the Materials folder, name it laser_mat, and choose the color RED.


Select the Laser GameObject from the Hierarchy and drag the laser_mat material to the Materials section in the Inspector window.

Create a new folder called Prefabs

On the Hierarchy window, select the Laser GameObject and drag it to the folder called Prefabs. You will notice that the Laser will be turned blue, that an indication that you have created a prefab of the Laser object. You can do this regardless of the folder's name, but to keep everything organized, it is nice to know what the folder is doing.

Create a new script and call it Laser, double-click it and write the following code:


In the method named MoveUpLaser(), the code inside constantly moves the Laser object up to make it seem that we are shooting. The DestroyLaser() method checks if the laser has reached a y potion of 8f. The Laser object will be Destroy() of the screen.
Add the Laser script to the Laser GameObject and, press the Overrides button on the Inspector window and hit Apply All, delete the Laser GameObject from the Hierarchy.


Create a new Empty GameObject, named it [ — LASER CONTAINER — ] and add the Transform information from the image


Updating The Player's Behavior
Double-click the Player script and add the following lines of codes and save the changes:

The new ShootingLaser() method checks if I can shoot when I press the Space key and a given time has passed. If I can shoot, I can call and clone (Instantiate()) the Laser prefab object where the player position is and store the new Lasers inside the Lasers Container to keep everything nice and organized.
Select the Player and add the Laser prefab (the one from the Prefabs folder) to the Laser Prefab field from the Player script; you can drag the Laser prefab, or you can hit the dot where the mouse is on the image, go to the Asset section and select Laser. Do the same step for the [ — LASERS CONTAINER — ] GameObject to the Lasers Container field.


Press Play to test it out.

🎮[PART 4: THE ENEMY]🎮